Showing posts with label wedding. Show all posts

Sunday, January 19, 2014

Bucket List #161: Officiate a legal same sex wedding

August 1, 2013 - Marriage Equality took effect in Minnesota. At 12:01am I solemnized the first same-sex wedding in the city of St. Paul:

I did five more over the next 24 hours. Each ceremony was completely different, and personalized to the couple - and each couple was wonderful and inspiring. After years in catering I've learned how awful weddings can make some people act - but on this day (night/day/night) there was nothing but joy. I was honored to be part of this historic day for Minnesota, and for each of the couples I worked with. 


Sunday, July 17, 2011

30 Days of Fun - 3...It's the magic number...

I am 6 months behind on photo albums (guess why?)but I do try to upload and crop my pics pretty regularly, if only so I back them up and protect them. After a HUGE weekend road trip for a beautiful family wedding we just arrived home and somehow The Cupcake was convinced to take just the perfect little cat nap to allow me to get through the pictures from our adventure. Along with a lot of fuzzy dance shots, dark church photos, and unattractive snapshots of people eating, I found a gem:


The expressions on each of their faces are priceless to me. TC was a trooper, through the heat, the travel, and all the noise she really kept it all together (perhaps more than us adults did) and we could not have asked for much more. Clearly, she had a little fun too.

Finding this photo brought me joy today :)

Wednesday, June 08, 2011

[MN]Love and Marriage


The [MN]Love campaign was started to encourage marriage equity in our state. It grew in reaction to the legislative initiative to put a proposed amendment to the Minnesota State Constitution on the 2012 ballot. The amendment would define marriage as between one man and one woman, writing the discrimination against homosexual couples directly into the state's governing document. While our state legislators could not seem to find time to pass a budget (thus resulting in the impending government shut down, with its significant economic toll and many paychecks lost for state employees who actually DO their jobs...), they somehow decided it was a priority to ban gay marriages. Constitutionally.

In every other state where a similar vote has been brought to the people, gay marriage has been banned.

In support of the amendment, groups like NOM (National Organization for Marriage - yeah, right) have launched high-buck public relations campaigns ranging from disingenuous to down right offensive. I'm choosing not to quote or link to any of them.

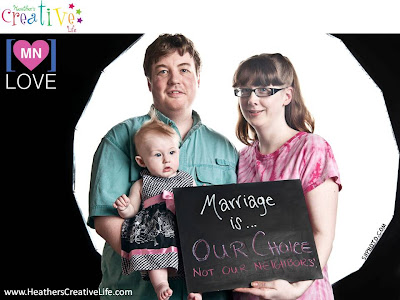
Instead, I joined the [MN]Love campaign and had a family photo taken by Simon Scott Stromberg.

The "Marriage is..." Campaign asks Minnesotans to define what marriage means to them, and to share the photos "as a sign of your support for equality in our great and LOVING state!" I chose to get involved because I think these photos are a beautiful, personal, and truthful refutation of NOM's lies.

Anyone can have a wedding, but the legal ramifications of marriage are what truly define it for me and many other Minnesotans. As a married couple, we are officially a family unit for tax purposes, insurance benefits, Medicare, and social security. We have protections as far as custody of our daughter, survivorship, and next-of-kin decisions regarding medical care and end of life situations. If our relationship ends poorly, we have protections in the form of a process to follow dividing our assets, debts, custody, etc. In addition to the personal vows we took, we signed a legal document to become a married unit which reaffirms that marriage is a serious decision you cannot simply walk away from or reverse without consequence.

Fewer and fewer young people are choosing marriage these days. Marriage might be in danger, but it is in no way because of GLBT couples seeking these same protections. Allowing gay marriage would strengthen my, and every other marriage in the state by showing it is an important legal transaction. Legal marriage encourages a culture of monogamy, commitment, and stability. All of these things are good for families, for public health, and for the economy.

Weddings, the celebration of a marriage pump millions of dollars into the state economy each year, and we are way behind on extending marriage to this 10%+ of the population - in these hard economic times, why on earth would we not welcome these celebrations?

This is not a "gay issue." Please do not think it doesn't affect you if you are already married or allowed to marry - an act of bigotry written into our state constitution harms us all. It devalues not only our marriages, but every other law and foundation of our government when we allow corrupt ideals to find legal footing. Be sure to vote NO on the amendment in 2012 - I want The Cupcake to grow up in a state where she aspires to be married and have a family (if Grandkids are anywhere as amazing as GrammyCupcakes seems to think they are), where that decision is hers to make (with a little input from mom, of course), and where we support healthy, loving relationships of all forms.

The most important part of marriage is likely not the legal transaction, it is the promises. When two people enter a union, they set the parameters of their relationship in terms of what they value - be it religious, social, familial, etc. It is what makes every relationship unique and why we choose the partner we do - because we wish to build a life together under shared ideals. This part of marriage is not legislated, but without the legal aspect of marriage it is only recognized by and significant to the couple involved. We need the legal aspect of marriage to make it more than a fading tradition, and to give value to ALL marriages, including those based on different belief systems than our own. It is why I believe that

"Marriage is OUR choice, not our neighbors'."


This isn't American Idol. This shouldn't be up for a vote. Our politicians should be ashamed of themselves for making it into one - we certainly didn't vote on any of their marriages, nor should we. Now that they have taken this action, it is important to act. Vote NO on the constitutional amendment in 2012, don't write discrimination into the constitution.

Get involved:
[MN]Love
Minnesotans United for All Families

Friday, May 27, 2011

State Fair Bridal Shower - Butter Bride

When you think of the Minnesota State Fair, there are a few main images that spring to mind. Corn Dogs/Pronto Pups:


Cheese curds, and the insane line for them that stretches around the booth several times:


And, of course, butter heads:


Butter PRINCESS heads to be exact, AKA the "Dairy Queens". Every year, each of the candidates for Princess Kay of the Milky Way are sculpted out of a giant brick of butter at larger than life size scale. They're displayed in a rotating cooler and each day of the fair one of the princesses gets sculpted live while sitting in the center of the cooler (with mittens and earmuffs and a parka - it has to be cold to keep butter firm!)

So we simply HAD to have a butter carving at the State Fair Bridal Shower. While we didn't have 40lb blocks of butter at the ready, I was able to make due with a 1 lb brick:


Butter Bride! Armed with a paring knife and a butter knife (which actually didn't work as well as the paring knife) I whittled myself a crude little wedding dress, a hint of a bouquet, and the stub of a neck. I knew that I couldn't do the bride's lovely face justice, and besides, this was a lot more fun! I cut her smiling face out of an existing photo, taped it to a toothpick, and embellished with a marabou poof that had fallen off of a boa. Voila! Butter Bride! She was the belle of the ball:


It was a really fun touch and so easy to do - imperfections and crude renderings actually make it even more fun than a really professional sculpture would have been. Or maybe I just mean funnier :) Make sure to keep her in the refrigerator until party time so she doesn't melt away, and use an actual photo on photo paper for the head as it's slightly more grease resistant than regular paper. Our butter bride made an excellent topper to our dessert table, which gives you a sneak preview of the rest of the goodies:


See also: Blue Ribbon Invitations

More State Fair Party pics to come, keep watching!

Wednesday, May 25, 2011

State Fair Themed Bridal Shower - Blue ribbon invitations

So stinkin' cute! That's how everything turned out for my dear cousin Carley's bridal shower. And now that the festivities have come to an end, I can share some of the crafty creations I contributed to the fete!

My mother/Carley's aunt hosted the party, but I'd say I acted as something of a "creative consultant" after proposing the State Fair idea. You see, Carley LOVES the Minnesota State Fair. LOVES IT. She makes it more than an event, it's a verb. She DOES the State Fair, from Machinery Hill to the Haunted House, Cheese Curds to Deep Fried Hot Dish, I'm pretty sure she even has special pants. And after a few years out of the state, (and more to come after the wedding) a Great Minnesota Get-Together was the PERFECT idea!

Starting at the beginning: Invitations! This was not my first inclination, I originally was running with sort of a corn dog bouquet theme, but it just wasn't working out, and in the end these blue ribbons turned out ADORABLE, so I'm glad I experimented a bit.


This was the first creative project I'd undertaken since The Cupcake's nursery, and the first time I've tried to accomplish anything of the sort since she came along - and it all went surprisingly well! I credit her swing with all of the success :) One day she conked out while swaying, and I sat down to cut out all of the pieces assuming someone else would need to assemble them...and when I finished, she was still sawing logs, so I started to put a few together...then, before I knew it, I was done! 43 of these pretty little rosettes I believe, in all different colors and patterns:


I used paper punches for all of the circles (the "ruffles" around the medallion are just a bunch of overlapping circles), and once I found the sizes that looked right together I created the "ribbons" to fit. I cut all of the "blue" parts out of various patterned paper from a 12" x 12" stack.

For the invitation wording, I started by downloading a pretty font from 1001freefonts.com (Calamity Jane) and laying out the text - this was the first time I'd ever printed on vellum and it worked GREAT, I'm definitely using that technique again. I like to use powerpoint to lay out my pages, I just measured my available space and set text boxes, then crammed as many on a page as I could to conserve paper when I printed. I cut them apart, and affixed everything with glue dots. For the back I cut another blank large circle from cardstock (same as the center front) and used it to cover up all of the double sided tape and glue dots holding the smaller circles to the larger one, and I ended up pasting a label with registry details on that circle as well.

We mailed the invites in large 6" x 9" envelopes, which are nearly the largest that can still go with one stamp. A few times I had splayed the ribbons too widely and had to bend a corner, but for the most part they traveled pretty well, and I was assured that everyone could tell what they were right away and start looking forward to the State Fair themed party.

More State Fair party pics to come, I promise!

Friday, September 10, 2010

Bucket List # 101: Officiate a Wedding

On Saturday, August 21, 2010 I checked another biggie off my bucket list - #101, officiate a wedding! I'm a little late in blogging on this, mostly because I didn't have any photos to go along with it (I thought bringing my camera up with me might get in the way), but now that the bride & groom are back from their honeymoon, I've been lucky enough to oooh and ahhh over the professional photos and write up the experience! Warning - this is a GORGEOUS wedding with a BEAUTIFUL bride, you may not be able to look away! But first, here's me in my formal role:


Do I look official enough? I am, indeed, a legally recognized wedding officiant in the states of Minnesota, New York, Wisconsin (with a note), and possibly Iowa, I keep forgetting to check. I became ordained shortly after my own wedding, where the brilliant officiant FORGOT TO FILE THE MARRIAGE LICENSE (legally required within 5 days) until I finally got ahold of him a month later and he recalled it was "in his truck" and he'd been "meaning to get to that." UH, WTF? With my love of event planning and background in public speaking I figured I could at least do a better job than he did, and became ordained through the Universal Life Church. I filed my credentials with the states I wanted to be recognized in, paid some filing fees, and voila! Instant officiant!


Fast forward a few years: I had never really pursued booking a wedding, until one of my closest friends asked if I would perform her marriage. Jana and I had been friends since high school (after a short stint as mortal enemies, which is hilarious in retrospect), and I immediately agreed and was so honored to be a part of her big day. I knew I'd be emotional and a little nervous, but I had no idea when I accepted that I'd be 5 months pregnant and totally hormonal on top of it! Nor did Jana, but for some reason she stayed calm and didn't fire me...


The maid of honor, another high school friend, was supposed to keep me from crying by making faces or some other silliness when I started to crumble...but before we even walked out the door, she burst into tears herself! Oh no! I put on a brave face and marched down the aisle.


That morning had been cool and foggy, but by the time we were about to start the ceremony it was bright and sunny. We stood overlooking the shores of Lake Superior on a large outdoor patio.


I think I was shaking pretty hard as I opened the ceremony, and I flubbed one early line, but somehow the rest of it flowed pretty smoothly. I had written my own opening remarks, a welcome with wishes for the couple that was both funny and heartfelt (I hope - that's what I was going for at least).


We got more laughs in the middle, when Jana tried to put Justin's ring on the wrong hand...which didn't fit, but she wouldn't let that stand, so she basically twisted and wrenched it until she realized the mistake. The sweet groom just stood there and let her abuse him. He's well trained already! It was very funny and memorable, especially when the bride exclaimed, exasperated, "Is this the wrong hand?!?!"


Jana had sent me the vows, but really gave me free reign on the rest of the ceremony. Though I'm not religious, I found a beautiful poem for the closing words that I think fit the occasion perfectly:

The Wedding Prayer, By Robert Louis Stevenson:

Lord, behold our family here assembled.
We thank you for this place in which we dwell,
for the love that unites us,
for the peace accorded us this day,
for the hope with which we expect the morrow,
for the health, the work, the food,
and the bright skies that make our lives delightful;
for our friends in all parts of the earth.
Amen.


And then I got to say those magical words - and they were REAL! - "By the power vested in my by the State of Minnesota, I now pronounce you husband & wife. Would you like to kiss the bride?"


(He did)
(And they lived Happily Ever After)
(And I filed the marriage license on time)

Jana and Justin, thank you so much for including me in your wedding, it was absolutely beautiful. I wish you health, wealth, and happiness for all of your days!

All of the above were shot by John at Celebration Photography.

Wednesday, September 16, 2009

Paper Flower Place Cards


Remember the million layered paper flowers I made a month or so back for Al's wedding? They were for the place cards, and they were ADORABLE - yes, I'm bragging, and I'm okay with that because I LOVED them! Each of the 3-4 layers of EACH flower were hand punched from various blue & orange papers, stabbed with a hole, stacked, and secured with a brad. Once the place cards were printed & cut, I scored, folded, and punched each of them, and then attached the flower to the corner via the brad. No two were alike, and I think they were awesome.

The bride helped too, I suppose I should give her props. Beautiful, don't you agree?
You need another look?
Allow me to showcase them for you, a la Vanna White:

Yup, I was so proud of them and hadn't managed to snap a photo of the final product, so I grabbed the wedding photographer (my new friend David) and he laughingly obliged. Good thing too - our waitress grabbed them all when she cleared off our table, I didn't even get to keep mine for the scrapbook! HELLO, THESE ARE MEMORIES PEOPLE!

(anyone get the movie reference? no? Melissa Joan Hart?)

Tuesday, September 15, 2009

Finally a photo of that hair style...


Remember my bridesmaid hair for Al's wedding/"Bump-It" review here? Back before I chopped off all that hair? Well I finally got a photo of the finished product, thanks to a wedding guest whose picture I probably ruined with my big ol' head (but hey, it works for me!). Remember this is after hours standing in the pounding winds (no seriously - they were CRAZY! One girl had a wrap dress that kept going all Marilyn Monroe and we had to actually pin her down to keep the photos decent. Hilarity ensued) and possibly some frenzied polka, so I'm more than impressed at how well it held together.

Friday, September 04, 2009

BUMP-IT!


I even have ANOTHER product review from last weekend to share(so many new experiences!) but unlike my Sleep Number Bed fiasco, this is a GLOWING review!

A while back I ordered a set of "Bump-Its" off of TV.

You know, these things you see on Sunday morning infomercials?

The things Ellen DeGeneres surprised "The Office's" Jenna Fischer with on this episode of Ellen?

I'm a self-admitted hair tragedy, and most of the time I just can't be bothered but these were so hilarious I had to try them. I ordered a set, upgraded to the "deluxe" rubberized coating (supposedly that stays in your hair better) and even got a free "Hollywood" bump-it for "ordering now!"

But I couldn't figure out how to use them. Most of my problem was that everyone in all of their advertising photos has bangs, and I do not - so figuring out where to place them was confusing, and I ended up looking like a cone head. So I threw them in the back of my linen closet and ignored them for a few months, till Alison's wedding rolled around. I stuck them in my bag at the last minute.

At the stylist, I still had no idea how I wanted to wear my hair. We discussed a few options, and I mentioned I had brought a set of Bump-Its. The stylist went CRAZY! She was so excited and demanded we try one. She started with the back, so this is pre-bumpage.

Don't I have a ton of hair? At first we were thinking the front half up, with the back long and curled, but as she started to see how resistant my hair was to holding curls, she urged me to put it all up. That ended up being a GREAT choice, since we battled raging winds all day! I was happy for each one of the 7000 bobby pins stapling my hairdo in place.

First we tried the "Hollywood" Bump-It, the one that is supposed to create "EXTRA DRAMA." Maybe a little too much drama, I thought it was approaching Elvira proportions and the stylist thought it looked too "porn star." Probably not the look Al wanted in her wedding party, so we switched down to the regular Bump-It.


Here is the bump "in progress"...All that straight hair eventually got pinned up into the 'do, and I had a big silver flower comb on one side...but I don't have any good photos of the finished product yet! Can you believe it? I'm sure I'll get one eventually, but it didn't occur to me at the salon. Here's close to the end, with the "bump" looking pretty great...


The Bump-It was a HUGE success - apparently you just need some actual hair design skills to use it! The stylist said she was sold - it saved so much time for her, and gave a really even effect. It felt secure but not painful, and since it was solid it held its shape all night, as opposed to a backcombed bump which tends to fall under the weight of my heavy hair. It also seemed far less itchy than the tangled hair version, so I didn't mess with it nearly as much. Bump-It gets a win!

I bought mine online, but I've recently seen them in Target stores and even Rainbow foods! I don't know if you get the "special rubberized coating upgrade" but I noticed they were about half the price (Rainbow was $9.99!), so might be worth a try.

Here's the one pic I've stolen from someone who caught the back of my head in something - what do you think?

Bouquet Charms = LOVE!


I am anxiously awaiting Alison's wedding photos, but in the meantime here is one of the few I snapped on my own - my bridesmaid's bouquet!

These were GORGEOUS - again, the prominent flowers were these amazing and intricate dahlias with a little greenery and some kind of lilies. They had satin ribbon wrapped stems and do you notice the one additional accessory?

Bouquet charms!

Alison custom ordered these off everyone's favorite site, Etsy. They're scrabble tile pendants with the initial of each maid's name on one side (a little trivia: in scrabble, H is worth 4 points!) and a different personalized design on the other - how adorable is my tiny mermaid?!?!?!

I thought this was a wonderful little gesture, and I can't wait to string mine on a chain and wear it as a necklace too. That is one part of the bridesmaid ensemble it's not cheesy to say I really WILL wear again! (Let's face it - everyone says that about the dresses, and nobody ever does). It's a great and special keepsake of the day, and I'm really so thankful that she took the time to pick an image just for me.

They also ended up being very useful as I kept setting my bouquet down in various places and losing track of it :) This way, we always knew which one belonged to whom!

Tuesday, September 01, 2009

Windy Weddings


We had lovely weather for Al's wedding this weekend, the one caveat being a tad more wind than is prudent for fancy hair dos. I was originally going to have part of my hair down, but the stylist vetoed that after watching the trees sway outside of the salon - more info about my bridesmaid hair to come, once I can get my hands on a photo of it :) But I'm blogging because it reminded me somewhat of my own wedding, where 35mph Duluth winds made photos a little dicey at times...


The veil flapped wildly in the wind at times, but my hair never budged - and I loved it. We got married in Duluth and I didn't really know any hair stylists there, but on a recommendation from my cousin I found Bre @ Language of Hair and she was awesome. She did both my hair and makeup (including fun false lashes) and she even came in special to open the salon just for me to do a New Year's Eve hair trial. How can you beat that? My 'maids looked stunning as well, so I'd definitely recommend Language of Hair if you're in that area - and it's not far from the Portland Malt Shoppe either :)

Sunday, August 30, 2009

Wedding Weekend Update


It was a jam-packed non-stop party of a weekend, and I am just DYING to see the pictures. I didn't take many myself, but there should be no shortage - their photographer generally takes 3-5 THOUSAND images in a typical wedding session! I think that if you line them all up you might get a flip book of the entire day.

And what a day! They're a pretty private couple so I won't be sharing much here, but suffice to say it was a great party - photos in a lush riverfront park, outdoor wedding on a patio overlooking the water, and a POLKA BAND at the reception! My feet are ACHING tonight and I'm pretty sure I lost about 10 pounds, but it was so worth it - what a blast.

I will share a few pics of some of the wedding crafts I had the privilege of contributing to, which I'm pretty proud of.

How gorgeous are these dahlias? I don't think I had ever seen one before Al started planning this wedding, but they are her favorite flower and they are amazing. They look like carvings or origami, each one is so unique and perfect. She ordered wrapped bouquets for us 'maids from a florist with dahlias, and then on the morning of the wedding a few of her friends and I picked up 15 more bunches she had ordered from a local grower at the farmer's market, and we arranged them all around the reception site. They were so fantastic, and what a wonderful feeling to have purchased them straight from a local grower.

I was so honored to be a part of this wonderful wedding, congrats newlyweds!

Friday, August 28, 2009

Explanation


I apologize for the apparent blog neglect, I have actually been crafting fairly hard core, but I've spent the last two days embroiled in my digital scrapbooking, so I don't have photos to post of any projects. I finished my June book (mermaid parade & NYC trip) and started on the weddings of '09 compilation. And SPEAKING of weddings, we're off shortly for Al's big polka wedding blow out in LaCrosse! It is SURE to be an amazing time, and I'll be sure to snap some pics of my craftastic contributions to share next week. Congrats Al, see you soon!

Saturday, August 22, 2009

Layered paper flowers


In happier news, PRIOR to walking in on the cinnamon roll hide & seek, I went to an open crafting night at my Stampin' Up representative's house. I had a pretty important project to work on, and I'm so happy I was able to finish it up (especially since I now have so much cleaning to do!)

Flowers!


I cranked out nearly 200 layered paper flowers, each one different, for my good friend's wedding this weekend! They'll be adorning the place cards, and I really love how they turned out. Her wedding colors are all different shades of blue, and her invitations and other stationery has had an orange dahlia accent - so using that as inspiration I rounded up all my blue and orange card stock. I used several different flower punches to cut over 1,000 different flower shapes, layered them up, punched them in the center, and held it all together with a tiny metal brad.

Tomorrow the bride is coming over to finish up the place cards and other wedding crafts, and I sure hope she likes these! I really enjoy the effect, and I think they're very whimsical and fun.

Thursday, August 06, 2009

Wedding Programs


I was going back through my archives looking for a post about my programs, only to find I hadn't yet blogged about them, so here they are!

This was another DIY project, fan-style wedding programs.

These were made from strips of colored card stock imprinted with our wedding logo and the ceremony details - wedding party, order of events, thank you, etc.

They were punched and secured by a heart-shaped brad, and had a tail of narrow satin ribbons. Each strip was a different shade of blue, arranged in a rainbow from darkest to light. I scoured craft stores everywhere to come up with all my shades of blue, and in the end they were perfect.

The fans folded flat for easy transport (especially to our out of town wedding)and were easy to fan out before the ceremony. We laid them on each of the chivari chairs so ushers didn't have to fumble with them when seating people, and I LOVED how they looked all laid out! It added a splash of color to the room, EVERYONE got one (as opposed to some weddings that make you share...come on people, if you want me to follow along, give me my own!)

I had a little "craft party" to assemble them prior to the wedding, my bridesmaids & soloist (and a few fruity drinks) created an assembly line and they were done in a flash!

Saturday, August 01, 2009

A Couple More Card Boxes...


I showed my sister's card box a few posts ago, and discussed how it was similar but SO MUCH EASIER to make than mine. That's because though they were both 3-tier cake-style boxes, but I went for a smooth fabric covering that involved countless clipping, folding, and hot gluing. I think it looked okay, but took HOURS. I decorated it with blue mardi gras beads to add some texture and shine, and a plastic wedding couple on top - the cheapest one in the Wilton section of Michael's.


After mine and before my sister's, I also helped a cousin make hers out of chocolate colored satin. The silky fabric was a challenge to keep smooth but very pretty, and the square shape was slightly easier to work with than a circle. We went less for a cake look and more for a stack of presents, with a big bow on top. Her wedding was a beautiful autumn affair with the fall colors of chocolate brown, cinnamon, reds, and oranges. Gorgeous.

Snow Globe Place Cards


Another DIY project from my own wedding: Snow Globe Place Cards!

I got mini photo snow globe kits with red foil heart glitter from Oriental Traders. They were a little slow and tedious to fill from our tiny hotel sink, but the effect was well worth it. We filled them all and let them sit for a while before putting in the inserts, and found only a couple that leaked, which was a pretty good success rate.

The inserts I created had each guest's name on one side, and a photo on the other. The photo was of a friend or relative's wedding, and these were so much fun. We ran the gamut from 1900's serious poses to 70's ruffled tux shirts to a true 80's rainbow (well, early 90's)to a couple modern-day events. A larger version of each of these pictures was framed (in a Dollar Tree crystal frame!) at the center of each table.


When people entered our reception venue, the globes were laid out with the names facing out. When a guest found their name, they looked at the other side of their snow globe and matched their photo to the one on their table.

This worked for us because we had a small (under 100 guest) reception. If you have more guests than that, you might need to post a map to direct guests to their table. Our area was small enough to see them without too much searching.


At the end of the night the snow globes functioned as a favor as well, guests could take them home and personalize with their own photo.

I loved being able to feature friends and family members on our table decor, and even while gathering the pictures we had great wedding discussions and lots of memory sharing.

To make the insert I created a template that fit my snow globes (mostly tracing then trial & error), measured out the approximate dimensions, and printed the photos in word at that exact size, careful to allow for the rounding of the upper corners. I used the cardboard template to cut out the images, and followed the same process with names. Once I had determined my table assignments, I used a small piece of double stick tape to bond the name to the table picture, and stacked them up for easier transport (our wedding was about 3 hours out of town). My bridesmaids & I assembled them the night before the wedding, and I loved the effect and the personal touch!

Friday, July 31, 2009

Bulk Gerbera Daisies from Costco


I briefly considered DIY-ing all of the flowers for my wedding, but decided I didn't want to be bothered and stressed with creating bouquets, corsages, and bouts as close to the ceremony as I'd need to work with fresh flowers. So I did hire a florist for those parts, and they were okay (not great...not nearly as great as my sister's flowers turned out)but I absolutely couldn't stomach paying flower shop prices for my reception tables. I looked at a lot of options, and ended up going through Costco.com for a bulk box of gerbera daisies, my FAVORITE! I don't have the exact figure from when we ordered, but they are currently listed at 80 assorted stems for just about $90, shipping and handling included. This is SO MUCH BETTER than the $4-5 each my florist quoted me!

Since we got married out of town, I had them shipped to my aunt's house to arrive two days before the wedding (Thursday). They came in two big boxes, and each flower had a little "hood" to protect the bloom and a "straw" to protect the stem. Per the directions, we removed the hoods (but left the straws) and stacked them all in big buckets of water. They looked GREAT! They perked up a bit with the water, and looked just as beautiful two days later for the wedding. I was a little worried about what colors I'd receive, since you don't have any control, but it was a pretty good assortment - red, pink, orange, yellow - they were bright and fun.


We kept them in the buckets till Friday night when we were decorating (that was awesome - if you can get in early to your site, I strongly recommend it. Totally cuts down day-of stresses). We cut and arranged them into blue bubble vases from The Dollar Tree.

I had great luck with this service, and would do it again in a heartbeat. At the end of the night we actually had people arguing over who got to take them home(I took that as a good sign they looked nice!).

Wednesday, July 29, 2009

Bright Bridal Banner


Another fun wedding craft! This time it's a banner for my good friend Al's bridal shower, which is coming up this weekend! The other co-hostesses and I picked a fun contemporary theme of umbrellas, and are using a bright summery color palate. Since the shower will be at a restaurant we don't need to worry about much decoration-wise, but I wanted a few personal touches.

This banner is a quick & easy craft project, and all of the pieces are re-usable and recyclable! Here's how I made it:

I picked up a "basics paper" book of cardstock in the "fun" collection, which are textured sheets in 10 solid colors. They are already cut to 5" x 7", which meant I had very little cutting to do. I made a template from the back blank piece of cardboard by marking the center of one of the short sides, and drawing lines from the corners of the other short side to make a triangle.

I laid the template on the back of each the pages and traced it lightly with a pencil. I then cut the two long sides of each triangle with a fancy scissor for a scalloped edge. That was the most time consuming part, my scalloped scissor was only about 2" to begin with, and for some reason the beginning and end of it don't cut strongly, so there was a lot of short slices: open the scissor, press down, open again, line up the design, repeat a million times.

I also tried to use a pinking shear scissors I'd picked up from the dollar store a while back, and it was total crap. Note to self: good cutting tools are worth it. Cheap ones are not. I cut one triangle with the pinked scissors and went back to my provocraft scalloped scissor. It wasn't great either, but much sturdier with a better cutting surface. I picked up a bunch of them in a drum at Michaels, all different cutting patterns.

Next I altered my template so I could use it cut two vertical slices about 1" long near the top (short edge) of each triangle. This was for the ribbon to thread through. I actually made it through the cutting process just fine, only to stab myself with the exacto knife later on when I leaned on it accidentally. OUCH!

I threaded a thick black cotton ribbon through, which matched nicely with the letters I used - which were a great find! Michaels had these packs of pre-cut paper letters in sort of post-it style pads, with a little bit of sticky tack on the back. A pack of over 300 was under $5, and this is a great deal. Cheaper than stickers, less work than stencils or cutting, and they really look sharp in contrast to the bright colored flags!

Mine is actually 2 pieces, so I could spell out more of a phrase - but I'll keep the exact final product quiet so the bride has a few surprises :)

I put the whole thing together in a couple of hours while watching TV, so it's definitely an easy and quick project, but I think it turned out really cute!

Together the pieces cost:
Paper: about $5 for 40 sheets(I only get it when it's on sale 40% off)so for the 24 pages I used we're talking $3.00
Letters: about $3 for 310 letters, originally around $5 less a 40% off coupon, so less than $0.25 for what I used.
Ribbon: $2.50, also on sale, used all of it (9 yards).
+ 1 Band-aid for exacto injury :)
Price for a cool, crafty, one of a kind & personalized banner: under $6!

Friday, July 24, 2009

This weekend: Bridesmaid Dress Alterations!


Here is the dress I ordered for my wonderful friend's wedding in just over a month, though shown on a woman-child less than half my size. Mine is in Mediterranean (slightly darker/greener) and will have the spaghetti straps intact. I feel like the rusching on the bodice looks more even and "striped" in person, not quite the bunched texture on the ad, but it's very comfortable and feels well made. My project this weekend is to determine if my mother can make the necessary alterations, or if I need to take it in somewhere - fast! Barbie couldn't fill this top out - I considered stuffing, but I could fit a Christmas ham in there. Better to seek alterations than risk anything falling out at inopportune times. Especially considering the reception features a polka band!

My friend is the coolest bride imaginable. Rather than dress her 4 attendants in matching outfits which flatter only one or none of us, she sent us out into the world with only the instructions to find a dress "in some shade of blue, and not floor length."

AWESOME.

This means that each of us, with our widely varied body shapes and skin tones, picked a dress that made us feel pretty and confident and comfortable. She's also letting us determine our own hair, makeup, jewelry, and shoes - which is such a thoughtful way to make your wedding party feel at ease. Instead of being bound to a certain payment, we can each set our own budget according to our needs and preferences. I found my shoes for the ceremony

on ebay for under $30, and plan to wear a necklace I already have. I am getting my hair and makeup done because that greatly reduces my stress - and my hair doesn't like to play along, so professional help is well worth it. Then I'll switch to some cheap flats for the polka party (I'm hardly graceful enough to walk in these 4" suckers, let alone polka. But I'm intent on looking statuesque and if nothing else, it'll force me to walk slower down the aisle).

I did a similar set up for my wedding, though on a smaller scale - I had just 2 attendants, this bride-to-be was my Maid of Honor, and lil' sis was my bridesmaid. Lil' sis actually picked her dress first, we just set out to find something knee/tea length and blue. She picked a royal blue Alfred Angelo, and the MoH decided to get separates from same designer in the same fabric. They looked stunning! I really think it makes so much more sense to let your wedding party have a say in the expensive apparel they have to buy for your wedding, and having been on both sides of it now, I think it makes you feel a lot more special and involved in the process when you have a voice in the matter.

Now if only I can master these heels!