Showing posts with label sewing. Show all posts

Thursday, November 04, 2010

Romp in the Swamp Louisiana Halloween Party - Invitations


It may be costly, and it may not be "green," but I still cling to invitations as an integral part of most parties. The invite is the first hint of the masterpiece to come, sets the tone for your event, and plants an image in your guests' minds that may convince them whether or not to make room on their busy social agendas for your party. With all of the other "competing" Halloween events out there, I want to capture my guests' imaginations early, inspiring them to create elaborate costumes and exciting them about the event.

But I also have to live within the confines of my budget & schedule...

So with those goals in mind, here are the invitations I created for our 2010 "Romp in the Swamp" Louisiana-themed Halloween Extravaganza:

For the party details, I used credits I already had to create a deck of cards through Heritage Makers (normally around $19.99, cheaper if you catch them on sale or host a workshop.) Just because they're called playing cards does NOT mean you have to put hearts and spades on them, like all of Heritage Makers' products they are fully customizable. I plucked an image of a spooky swamp off of Google images (I believe it's from one of the Pirates of the Caribbean movies?), centered it in an antiqued looking frame because it wasn't quite hi-resolution enough to resize it over the whole card, and added the party title as a caption. This image was the "back" of the playing card, so it was printed on the entire deck.


For the other side, which would normally have each separate number & suit (2 of hearts, 3 of clubs) I typed out the important factors my guests needed to know - theme, date, costumes REQUIRED, RSVP email, BYOB request, and NO KIDS decree (unless you could keep them in your womb all night). I worded everything slightly more creatively (in my humble opinion), but you get the idea. I split the deck into 2 halves, and spread the info over 2 "pages" to be readable.


When the cards arrived, I used clear tape to seal each of the pages together like a little book - the swamp scene on the outside, party details inside. Because I already had the credits to make the cards & the tape, this part cost me: $0.

And for the "big wow" factor I knew I wanted to play up on the voodoo aspect with some mini voodoo dolls. I looked around briefly at purchasing (too expensive), and though I found some tutorials for string or stick versions, in my head a voodoo doll was plushier, so you could stick pins in strategic places. So I set about creating them myself.

I used a gingerbread cookie cutter as my pattern (Wilton, I believe, from my stash of them) and cut them from 2 layers of black felt ($2 after my 40% off coupon at Michael's, it was enough to cut at least 35 sets).


For the hair and hearts I got some smaller sheets of colored felt ($0.29 each - I used most of one white sheet, and barely made a dent in the red, blue, green, purple, and pink ones - less than $2 for all). The "faces" were made by tracing around a shot glass, the eyes are tiny buttons from the quilting section of Michael's (about $4 for 2 packages). I secured all of the embellishments with fabric glue to save time - it was way easier to use, but made it almost impossible to sew through, so keep that in mind when you are applying and keep it away from the seams. The fabric glue was about $7 with a 40% off coupon at Joanns, and I still have most of it left.


I had a bunch of tiny spools of colored thread from an old sewing kit (no idea where that came from) so I used that to messily whip stitch around the edges of each doll, and stuffed them with fiberfill from an old pillow that had torn, but I kept around for just such an occasion.

To underscore that these were VOODOO dolls (in case people just thought they were strange gingerbread men or something) I knew I wanted to include some pins. I printed off lists of words one might cast spells around - wealth, love, passion, luck, pain, health, hatred - each in a different font, and in a different color. I cut them into strips so that the word was on each side of a tiny flag, and secured them to pins with double stick tape.


I had already printed the words when I went looking for the pins, but I found these awesome "wheels" of colorful bead-topped pins that matched PERFECTLY! I bought them during "coupon commotion" week, so I was able to use 40% off coupons on all 3 wheels, for a total of just $14 for all of the pins.
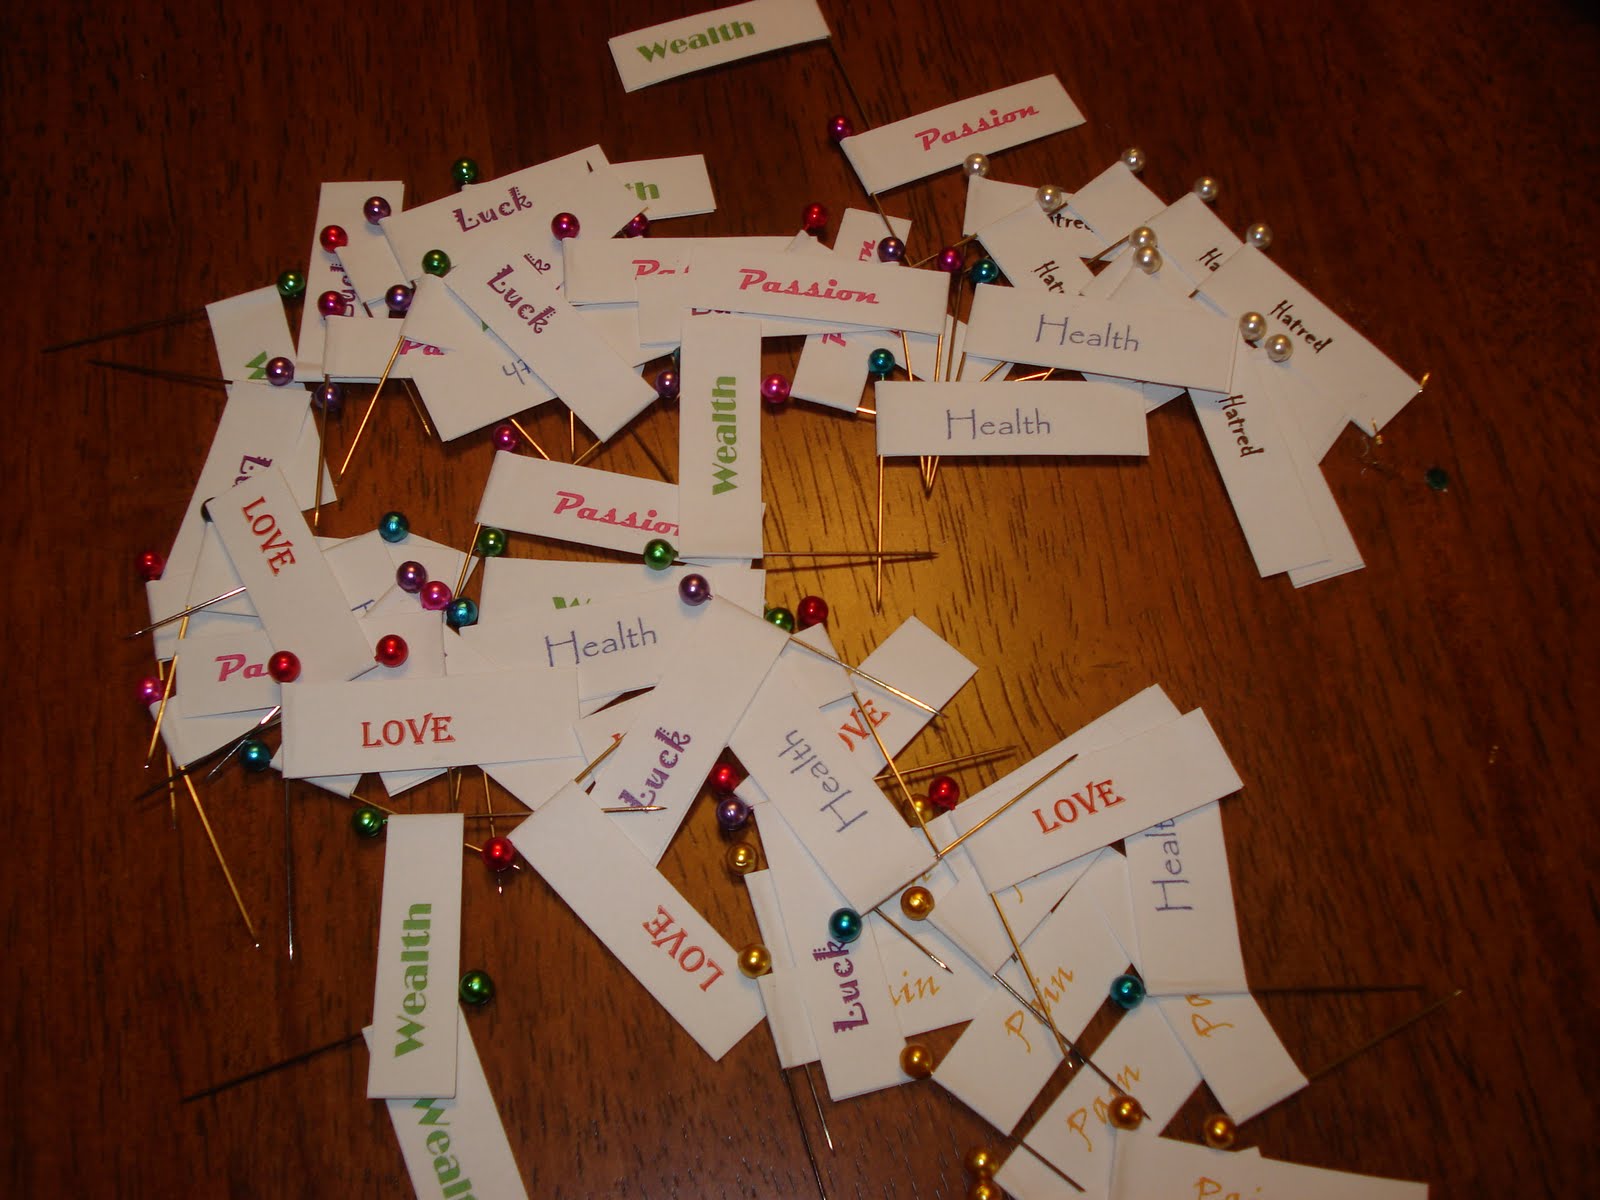


I punched the cards with a tiny hole punch, strung through some gold ribbon I had lying around, and looped it around each doll. Then I stabbed 3 pins in each, positioning them carefully as not to let them come through the envelope and stab anyone, wrapped them in 1/4 sheet strip of tissue paper, and stuffed them in envelopes.

I had a box of 1/2 sheet envelopes lying around from a previous project, so again, that didn't cost me anything, and I used printable labels for addressing. I downloaded a creepy typewriter font from 1001 free fonts (google it - excellent, free, and fun, except there is no "1" character, so you have to use a lower case "l" and really watch what you are doing, or you'll have "0" where you typed a "1"). I paired it with a clip art voodoo doll from google images, and voila!


To save money, I did hand deliver about half of the invitations to people I was seeing for various things the week I sent them out, and the rest got mailed at a cost of $1.22 each.


Total cost for invites was about $55 for 30 invites.

Tuesday, July 13, 2010

Mermaid Parade 2010

Oh Hello Internets, how have you been? I've been quite busy...avoiding you! But now that the proverbial cat is out of the bag, I can finally post some photos of our NYC adventure without raising quite so many eyebrows (is she supposed to be a mermaid or a WHALE?), and PERHAPS, if the nausea and exhaustion ever do subside, get back to a little crafting...

But first things first, NYC! While it was far from the most opportune time to travel, it was EXCELLENT to catch up with my BFFs again, share some laughs and some really great meals, and of course make some costumes. My original plan to make a fancy gown fell by the wayside due to budget cuts and a time crunch, and good thing since I ended up busting out of all my clothing the week before the trip. This, however, also meant I couldn't wear either the sundress or last year's costume as an alternative, quite the conundrum. In a fit of self pity as I wandered the aisles of our new Jo-Ann's store, a gorgeous embroidered Sari fabric caught my eye...and it was on sale! I scooped up 4 yards for about $20, and Burda pattern 8327 for an asymmetrical trumpet skirt (also 40% off):


I threw that all in my suitcase and presented it to Ryan, who turned it into a GORGEOUS skirt in about two hours:


Seriously, is that fabric not to die for? It's called "pistachio" and has gorgeous gold threads, I <3 it fully. And Ryan, the perfectionist, serged, pressed and sewed each seam so that I could actually wear this to a wedding or dinner with the queen, not just to a costume parade. I finished the look with two giant sequin appliques from the garment district that I basted on to a nude lace tank top (I sewed that part myself!) The combination of giant dinners + incubating the tadpole did threaten to bust the zipper by the end of the week, so please be kind...but the final product:


Wee haa! I wasn't quite brave enough to go bare under the lace tank, so I layered it on top of a nude tank top, borrowed the fabulous wig from Ryan's shop, and recycled the crown from The Queen of Hearts costume, which was PERFECT.


This skirt was MUCH easier to walk in than some of my previous mermaid attempts (especially a worry when dealing with subways, stairs, and crazed pedestrians), and I think it still definitely gave off the "mermaid" vibe without being completely literal (aka - hard to move in). The wig, eyelashes, and crown were a perfect balance of whimsy and glamour, I had a really fun time getting dressed up. How cute did we look?

Saturday, February 20, 2010

There is a book review in here somewhere...

How did I not have a "vampires" key word for labeling posts yet? Apparently when I first started sharing my secret shame with all of you, I didn't plan on making it a regular feature. Room to grow I guess. But since a sad amount of my life takes place on the vampire bandwagon, it's time for another installment of "those naughty books!"

Brief interruption: true story, minor digression: I was introducing the amazing Krista to my mother, and for some reason my primary technique for introductions involves describing people by what they were for Halloween the prior year. Yeah, it makes no sense to me either, but I can say the name "Krista" a million times and hubby won't know what I'm saying, but if I say "Meg Griffin Girl" he immediately gets it. Confused?

Clarification: Halloween 2008, Krista won "Most Original Costume" for her spot on Meg Griffin portrayal:


Is that not a spectacular yet simple home made costume? Love it! and it totally went with our "Hollywood Halloween" theme. Then, last year Krista once again pulled out a big bag of awesome with her twist on the Wonderland theme - VAMPIRE ALICE:


She made the red dress and white pinafore from SCRATCH, and I always give huge bonus points when people go to the lengths of pulling out a sewing machine and ironing board for costumes. That's commitment. And hello, how lovely are those fangs?!?! In a strange twist of fate, those creepy realistic chompers have a warning label cautioning you not to drink red liquids with them in. Apparently they stain - so sad. Maybe with a straw. Of course, in a pinch, Long Island iced tea works too.

Remember how this started out as a book review?

So one day, about 5 paragraphs ago, I was introducing Krista to my mother and explaining that she was in my "book club" and dressed up as Alice last year, Meg the year before. My mother gave a look of confusion "Oh, I don't watch those naughty shows..." assuming each was some sort of half naked character on a smutty vampire series. Egads. I'm developing a reputation.

AND IT'S ALL KRISTA'S FAULT. She is the local purveyor of all such smutty vampire media for a growing circle of us embarrassed but eager consumers. She got us all hooked and since she has the least willpower of all, she buys all the books immediately upon publication, reads them overnight, and then is nice enough to pass them around to the rest of us. I have previously admitted reading all of the Twilight books (terrible, but intriguing) and the Sookie Stackhouse novels (yum!) and then Charlaine Harris' other serials (not great, but good enough). Then for some reason I decided to spin out on my own and try selecting some books, which has not been nearly as successful. Thirst was awful (I had to erase that sentence 3 times to avoid bad unintentional puns - "sucked" and "bit" were my original choices, but even I couldn't do that to your ears. Eyes. Whatever.) After that fiasco (I'm still not sure if I'll give the other 2 stories in the book a chance) I dove into the Anita Blake, Vampire Hunter series. I had high hopes. Another series to follow would be GREAT, especially one with a bunch of books already out so I don't have to wait a year between installments.

But I'm not loving Anita Blake. :(

It is definitely not anywhere near the craptacular nature of Thirst, but I'm not at all hooked either. I am finding it really hard to like the heroine, the weird religious undertones (souls are very important to her...which is not a given for me, and not well explained) and of course there is the problem that the covers look like romance novels (which I'm somehow more embarrassed about than if people actually knew they were vampire stories). The characters have annoying names I mentally trip over and argue with (Nikolaus for a woman just seems to be trying to hard), Jean Claude & Phillip just all blend together to become one cheesy vaguely French bustier ripping leading man - Jean-Phillipe-Claude-hopper. Blah. And there's all sorts of misty allusion to some dark thorny past that really needs to start coming out more significantly because I am just kind of bored.

I made it through the first book, not nearly on pace with books I've liked more, and it did pick up some towards the end, but I'm not sure if I'll be trying out any more of the series. Krista passed off a Sherrilyn Kenyon book which has an even MORE embarrassing cover, and the title "Fantasy Lover" that I'm planning to try next. I think I might have to start making little brown bag book covers for this kind of smut, sort of how a hobo hides their cheap liquor in a bag to lessen the shame. And hide from authorities.

I'm also mixing this up by starting "The Help", which I hear is very good despite zero vampires. An though I've borrowed it in hard cover so it doesn't fit in my purse, it is much less embarrassing to take out in public.

Monday, February 01, 2010

The Next Mermaid:

OF COURSE I'm already thinking about it. And OF COURSE I have to go back! Last year's Coney Island Mermaid Parade was amazing even with the monsoon, and I think I'm hooked. I've yet to book my plane ticket, but I have already purchased a pattern!

It's Vogue 8190, a strapless ruched ballgown that is the epitome of mermaid-y-ness. It's well beyond my sewing capabilities, but luckily I have RYAN on my side!

As soon as I can figure out how to read the fabric requirements (I think they're in Greek) I just might send the whole thing off to him :) SURPRISE!

I'm visualizing something dripping in glitter, since that is basically my dream outfit, and when else can you drape yourself in glitter? My day-to-day life is sadly lacking in sparkles. Last year I went with blue, which was fine and mostly decided by the last minute available fabric selection, but this year I think I'll head back towards the traditional green. (I'm hoping Jana will do a matching one in purple!). I'm aiming for the long one, of course :) Probably not the lace overlay, assuming I find an appropriately fun fabric, but I'm not ruling it out yet. I do have a knack for choosing the most difficult fabrics to sew, so we'll see if I can keep that trend alive and keep Ryan "challenged."

Less than 6 months until King Neptune opens the beaches again! See you there, NYC :)

Thursday, November 05, 2009

Tips & Tricks: Wicked Wonderland Queen of Hearts Costume

I build costumes in totally the wrong order, which is to say I waste a lot of money. I buy a ton of fabric when it catches my eye, then try to make it into something, which generally means I've bought TOO MUCH fabric. I suggest you plan first. Though I didn't. I first found this red glitter netting that I was loving, and picked up a ton of that:


Then on another trip I fell in love with this silky red & black blotchy stuff, that sort of looked like blood spatter:


When Ryan came to town, we finally laid out a plan. In no time flat he whipped out a coat. We used this pattern, Butterick 4732, which I referred to as the "Michelle Obama Coat" without the sleeves. Too bad my arms don't look like hers ;)


Since it was one night only and I'd probably never wear it again, we didn't even worry about hemming or finishing raw edges. Later I picked up some frayed fuzzy black trim and ran it down the front from one edge to the other along the opening, and that seemed to finish it off just fine. The trim was from the Halloween collection at Joanns - I didn't end up using the red sequins:


Then we constructed the grand collar, which required a little engineering and a trip to Menards. We got two flexible plastic tubes from the plumbing department, they were sorta red and probably an inch in diameter. We bent each tube into a teardrop shape, and secured them together with zip ties in a heart shape. It was lightweight, but really secure.

We laid out the glitter fabric (doubled) and traced around the heart structure, leaving an extra couple inches all around. Then Ryan sewed around the top 1/2 of the shape to form a little casing. You can't sew all the way around, or you won't be able to cram the tubing up into it. The rest was handsewn, just a quick baste.

Here's where a little flaw came in - the fabric I chose for the coat was a little too flimsy to really support the collar, but we made it work. I basted it to the back of the robe, mostly down the center back seam and it held okay since the heart structure was so light. If you're keeping track, the red glitter was a great choice - very lightweight, but the bloodstained fabric was too lightweight.


Ryan had to fly back to the Big Bad Apple, so after that he left me to my own devices. I searched 3 fabric stores looking for the pointed lace trim from my inspiration photo, but everywhere I had a coupon for only had small amounts. On a whim I stopped in at Hancock Fabrics and they had tons. I had pre-measured (for once!) and knew I exactly how much I needed - it hurt me to pay $7.99 a yard, but it really made the costume. Overall, I spent nearly $100 on trim alone. Ouch. I glued it around the edge of the heart, on the excess we left on the outside of the stitching:


And I did the same thing on the back side of the heart, but on the inside of the piping:


After this photo, I added a gold starburst in the back center, to cover up the hand stitching - it was actually a lightweight Xmas ornament, but I never snapped a photo. I also added an inner line of trim in the same red & gold color pattern on the front, this helped camouflage the inner line of the tube you could sorta see through the glitter fabric. I just used simple fabric glue, which saved a ton of time but also made it so I probably can't re-use the expensive trim. It was a toss up - but I was short on time, so the glue was the way to go!

The base of the costume was just a black bridesmaid dress I scooped up at the Goodwill for around $8. It was a little too big, but Ryan took it in, and it ended up being perfect - and a lot cheaper and less time consuming than making something from scratch!

I rounded out the look with this GORGEOUS costume necklace from Ryan's costume collection. I'm in love with it. In fact, I fell in love with it on my last trip to New York, and definitely planned my costume with it in mind. And I may have worn it out for Chinese food as well.


The red fingerless gloves I ordered off Ebay, and I made my staff from a rubber human heart (BuyCostumes.com) and a broom handle, with some extra fabric remnants tied around the top.


I had a hard time deciding on hair - first I was going to spray mine bright red, but then I cut it (twice) and really didn't have enough left to work with. So I ordered this Vampire wig from BuyCostumes.com without reading the reviews - I have to say I agree with all the negativity, it certainly looked nothing like that smooth sculpted cut when I unwadded the one I was sent. As a last ditch effort I picked up a wig on my lunch hour from Party City, and it actually ended up being perfect! The coloring matched the cloak completely, and several people thought I should consider the color scheme for my everyday 'do (not likely, but thanks guys). Overall I wasted a lot of money on hair spray and the other wig, but the wig I did use was only $19.99 and is sure to come in handy again. It's the "Temptress" wig:


I wore a wig cap underneath, similar to a footie nylon you use to try on shoes at the shoe store. I ordered it from BuyCostumes.com with the first wig, and it was under $5. It was really helpful keeping all my short unruly hair back and confined under the wig - and it was hilarious to see what I looked like bald. Hopefully not a look I will ever have to adopt.

The crown is actually a Christmas Tree Topper! It's from Macy's or Nordstroms a few years back, I saw it across the mall and heard angels singing like in a movie - I had to have it! In hindsight I wish I would have bought a bunch of them, they'd be great for all sorts of things. I think it looks like the perfect quirky fairy tale crown, I could just see the frog prince wearing it.

I planned to sew the crown to my wig, but when I did a costume trial the night before it actually worked just fine to bobby pin it right through the wig and cap, so that's all I did. I wanted it slightly off kilter (part of my metaphor for the off-kilter queen) and I'm sure it moved a lot, since every time I went down the stairs I whacked my head on the ceiling, but it was otherwise comfortable and I loved the look.

I had a minor disaster with the eyelashes that involved some screaming, gluing shut of my left eye, and a lot of redness and burning, but that eventually cleared and I had Al help me out. This is really the best option for affixing whole sets of lashes - it has to be a team effort. I absolutely can't relax my eyelids if I'm trying to hold one open and one closed, which is okay for applying individual lashes but a total fail for full sets. Al did a great job, and I had long black lashes with red jewels along the lid - picked them up at Party America and used glue I already had. I think they were around $6. I could have reused them, but due to the first glue incident I think I had too much adhesive and actually had a really hard time getting them off (this is the first time that has happened, I've never had a problem before). They were pretty chunky with glue (as were my eyes for a few days too!) so I just chucked them out.

I've never been good with makeup, but I did my best to achieve a scary smokey eye - I grabbed a random dark eyeshadow set at Target for under $5 and a soft black eye pencil. I put dark shadow all over my creases, smeared it around, and topped it with Bare Minerals silver glitter. Worked for me. I outlined my lower lids and did some minor work with the eye pencil, but mostly used it to give myself big black evil eyebrows. There was no great science to that - I just eyeballed and freehanded it, I knew the wig would cover a lot of it anyways. Red Rimmel lipstick topped it off. This isn't the best photo, but it's one of the only closer up ones I have:


I felt pretty good when I answered the door for a trick-or-treater and he said "Daaaaaaaaang!" when I popped my head out. Mission accomplished!


All in all I think it came together pretty well! I learned a few lessons - #1, fabric and trim are VERY expensive. For the price of this costume I could have bought a full out ballgown or the most elaborate costume in the shop. I'm going to have to find a better balance, which is likely through better planning. #2, whenever possible, re purpose something rather than make it from scratch. The basic black skirt & top I picked up is a great example. Also a good example of the colored tag sales at Goodwill :) The big heart collar was large and made a statement, but didn't impede my movement too much, just when it was really crowded around the buffet line or bar. A few people called it "wings" (I wondered what they thought I was?) but most people got it - at least in the context of the Wonderland party!

Wednesday, October 28, 2009

Fantastic Home Made Costumes:

Can you tell Halloween is on my mind today? I'm CONSUMED and finding it hard to focus on anything else, so to pass the time - here are a few of my favorite clever costumes floating around the internets, from my fellow Halloween Addicts at Halloween Forum:

The octo-MUMMY:


Pregnant Zombie - on a woman 7 months pregnant:
I couldn't handle this gore, but I find it really spirited and impressive :) Would definitely freak me out!


Lydia from Beetlejuice (wedding scene):


Napolean & Neapolitan (English majors have to like word play):


Victorian Vampire - I'm a sucker for a silver dress, and this one is GORGEOUS:


Now this looks like any other storm trooper costume, BUT it's not!
This one is "Made from about $10 of craft foam, velcro and elastic." The real kicker is they incorporated an MP3 player to blast the Imperial March while the kid trick or treated. Now that creates a whole new level of awesomeness.

Friday, October 16, 2009

Curtsy while you're thinking...it saves time...

I'm on a roll! I thought I was done for the day after my frustrating shopping trip, but a few hours of downtime in front of the DVR and I was itching to go use all of my pretty trims!


How's it looking? I used fabric glue for the first time and I might be a bit punchy from the fumes (which I can hardly smell through my clogged nose, but the prevalence of warnings on the label convince me), but so far I think I like it! I added two kinds of gold trim on the collar, a pointy lace and a smaller braid of red and gold, and I also added a back frayed embellishment down the front of the coat. The fabric glue is AWESOME - I picked it up on a whim in the checkout line at Hancock fabrics, and it is so worth it - we'll see how it holds up, but so far it seems really quick and easy, and for a costume to be worn on 1 night, there's no reason to spend a lot more time and effort on sewing.

How awesome is that necklace? Borrowed from RJM Costumes (That's Ryan) Gotta love friends with huge stashes of costume jewelry! I wore it out for Chinese food last night too, I can't keep my hands off of it! :_

Mission: TRIM-possible...


Three fabric stores and more than a few frustrations later, I've got trim! The first TWO stores I went to had less than a yard of this gold lace, but the third one (the only one I didn't have a coupon at) had more than enough, so I just scooped it up. I think it's the perfect touch to frame up my grand heart collar :)

Thursday, October 15, 2009

Progress - Finally!


Well, Ryan came to my rescue and worked his magic again, I should never doubt his power. I was feeling pretty down about all the Halloween work I still had to do, and of course I'm still battling this cold, but a few minutes with Ryan and we were off and running.

Here's just a sneak preview - I don't want to give it all away yet. I'm still working on the finishing touches and have a lot of trim to find so I can really embellish my evil queen, but I'm feeling really good that I have the "bones" put together. Norm was also having fun:


He kept laying right in the middle of my glitter fabric, so needless to say he'll be sparkly for a while :) How festive!

Thanks Ry, I couldn't do it without you, and I miss you so much!

Halloween, I finally got my groove back, and now I'm hot on your tail! 2 weeks to go!

Monday, September 28, 2009

Royal beginnings...

I'm always torn between keeping surprises and sharing every little detail of what I'm working on here...I waffle some, but in general, I'm finding that sharing helps build the excitement and people will still be excited to see everything come together in the end anyways.

So here's the start of pretty big project - my costume! As you'll recall, I'm planning to host as The Queen of Hearts, perpetually pissed off and blood thirsty as she is - I thought it was a fitting and fun character to create. My best bud and professional costumer Ryan (the mastermind of our amazing mermaid parade costumes) will be heading into town in a few weeks and has vowed to help me out, so I want to be as prepared as possible to take advantage of his skills!

I picked up Butterick pattern 4732 because of the long formal coat. It looks fairly simple to make, and my plan is to alter it slightly to include a huge heart shaped stand up collar, like something Queen Elizabeth would wear - something that feels like this:

How amazing would that be?!?!? It's dramatic and a little scary, and definitely makes a statement.

I'll share my fabric choices once I get a picture of them - sticking in a red & black dark & twisted theme, and I'm currently planning to wear a black overbust corset and long black mermaid style skirt under neath. I'm also working on a crown to complete the outfit. What do you think? Fit for a queen?

Tuesday, July 28, 2009

Custom Mermaid Inspired Sundress


Here is yet another bucket list item I crossed off recently:
#43 Have a garment custom made

When I wrote this list I was thinking the "garment" in question would be a suit or ball gown or something decadent, but as fate would have it, I stumbled into a situation and ended up custom ordering an adorable sundress on Etsy!

If you don't know about Etsy, I'm sorry to fill you in - because you will probably become addicted and spend both hours and fortunes lost in all the treasures. Etsy is an online marketplace for crafters and artisans, where anyone can set up their own shop and sell their handmade, vintage, or craft supplies. It's sort of like Ebay but with set prices instead of auctions, and instead of used crap it's all either new or vintage. So far there's a lot less fraud and crap to get in the way, so it feels much more secure, though I suppose it only takes a few bad apples...

I love etsy.

They also have a special section called "alchemy" where you can essentially post a "want ad" and anyone with a shop can respond to your request with a bid to complete the project. I originally posted an ad looking for a mermaid COSTUME (back way before the Coney Island Mermaid Parade), then in talking with one of the shop owners who responded, came up with the idea of doing a less literal adaptation in sun dress form.

Custom made just for me!

I accepted NancyNeedlesandPens bid, because she had an established shop with a good history, and her clothes looked high quality and cute. She had mostly done kids stuff, but I figured that worked in my favor as far as durability :) It was actually a child's sundress that inspired my design, I liked the tiered ruffles idea. We emailed and I sent her my measurements, design, and fabrics.

I did a drawing of what I was hoping for - tiered skirt, halter top, appliques on the bust, and a low back to show off my tattoo. She found a pattern that accomplished most of that, and we agreed on changes to the back & skirt (less wide). She was fantastic and I LOVE the final product! We made a few adjustments as the process unfolded, and I was very pleased with the final product - the photo above is what she sent me to approve just before she sent it across the country to me (I believe she's in Oregon or Washington - looks like maybe on the water!).

I didn't end up wearing it to the Mermaid Parade, the pull of spectacle and sequins was too great and I decided to go much bigger for the actual festival (and then scrapped that and went in a 3rd direction once I actually got to New York), but I do think this dress is fantastic and I will make good summer use of it. It definitely suits my personality :) and it's all cotton, so completely washable and easy to care for!

Friday, July 24, 2009

This weekend: Bridesmaid Dress Alterations!


Here is the dress I ordered for my wonderful friend's wedding in just over a month, though shown on a woman-child less than half my size. Mine is in Mediterranean (slightly darker/greener) and will have the spaghetti straps intact. I feel like the rusching on the bodice looks more even and "striped" in person, not quite the bunched texture on the ad, but it's very comfortable and feels well made. My project this weekend is to determine if my mother can make the necessary alterations, or if I need to take it in somewhere - fast! Barbie couldn't fill this top out - I considered stuffing, but I could fit a Christmas ham in there. Better to seek alterations than risk anything falling out at inopportune times. Especially considering the reception features a polka band!

My friend is the coolest bride imaginable. Rather than dress her 4 attendants in matching outfits which flatter only one or none of us, she sent us out into the world with only the instructions to find a dress "in some shade of blue, and not floor length."

AWESOME.

This means that each of us, with our widely varied body shapes and skin tones, picked a dress that made us feel pretty and confident and comfortable. She's also letting us determine our own hair, makeup, jewelry, and shoes - which is such a thoughtful way to make your wedding party feel at ease. Instead of being bound to a certain payment, we can each set our own budget according to our needs and preferences. I found my shoes for the ceremony

on ebay for under $30, and plan to wear a necklace I already have. I am getting my hair and makeup done because that greatly reduces my stress - and my hair doesn't like to play along, so professional help is well worth it. Then I'll switch to some cheap flats for the polka party (I'm hardly graceful enough to walk in these 4" suckers, let alone polka. But I'm intent on looking statuesque and if nothing else, it'll force me to walk slower down the aisle).

I did a similar set up for my wedding, though on a smaller scale - I had just 2 attendants, this bride-to-be was my Maid of Honor, and lil' sis was my bridesmaid. Lil' sis actually picked her dress first, we just set out to find something knee/tea length and blue. She picked a royal blue Alfred Angelo, and the MoH decided to get separates from same designer in the same fabric. They looked stunning! I really think it makes so much more sense to let your wedding party have a say in the expensive apparel they have to buy for your wedding, and having been on both sides of it now, I think it makes you feel a lot more special and involved in the process when you have a voice in the matter.

Now if only I can master these heels!

Thursday, July 23, 2009

Halter Top #2


In honor of today's 85 degree temps, here's another halter top. I made it from the same pattern as before, though for this one I took a chance at altering. I completely removed the upper back piece to create a more open back and show off my mermaid (it wasn't done at the time I took these pics). I should probably add some elastic along the upper edge of the back piece to keep it more secure, but for a breezy cotton summer shirt, this was again pretty easy to throw together, and a good pattern to experiement with.

You'll recognize the fabric from the aprons I made for Al & lil' sis too, I can't help it - I just think it's adorable!

Tuesday, July 07, 2009

Halter Top #1


Here was my first daily wear sewing project in a long time (maybe ever?), it's a halter top from a pattern, which actually was a huge step forward for me, I've never done well trying to follow patterns. My friend Ryan jokes that I don't sew, I build. Generally with a glue gun and duct tape. But I tried a pattern and this one was pretty easy!

The fabric is actually quilting fabric called "running eighths" from Jo-Ann, I loved all the different patterns and cotton is perfect for summer.

The top is self-lined which is really nice (and I find less and less in store-bought things these days - I don't understand what adult woman feels comfortable wearing these thin see-through fabrics). There are ties at the bustline that make a bow at the back and help adjust the fit so you don't have to be quite so exact or bother with elastic or zippers, though that should probably be the next thing I learn.

Monday, June 29, 2009

Mermaid Bodice


I promise I will get back up to speed in posting my creations, I got a bit sidetracked with my excellent NYC trip, and while I still have more mermaid parade photos to post, I'll do so sporadically and interspersed with my own creations.

I thought it might be nice to highlight how my mermaid ensemble was created - though not exactly by me :) My excellent old friend, Ryan j Moller (the lower case j is intentional - look for his website coming soon!) is a costume and wig designer living in Brooklyn, and he whipped my whole look together in just hours.

The bodice was from this pattern - Simplicity 4401, a very mermaid-ish formal gown. He made view "A" but without the overlay (the overlay would be great too in a contrasting color to look like a seashell bra, but I found the beaded appliques I fell in love with). For fabric I had brought a peachy satin (it was the closest my untrained eye could find to flesh toned) and he had the brilliant idea to use the reverse side which looked so much better. It was matte, which blended much better, and also held up to the rainy conditions a lot better than a satin side would have.

He altered the shape of the back to scoop it down lower and show off more of my tattoo, but otherwise it's pretty much following the pattern. The boning made me feel supported and sucked in, not to mention kept the strapless top up really well. The appliques were just stitched on top, and voila! A very classy, non-naked, comfortable mermaid top for women of all sizes.

If you're not a fan of strapless, you could always add a pearl or jeweled tie behind the neck (view B) for more support.

A flesh-toned corset could be the base for all sorts of costumes if you prefer the illusion of a bare top without actually showing that much skin - some that spring to mind are Eve, Lady Godiva, a Vegas Show Girl, plastic surgery patient, streaker, Britney Spears, etc.

Saturday, June 20, 2009

Sneak Peak Take II:


I also made Ryan's crown (only fair, since he did all the rest) and here's that sneak preview. They were both made on bridal-type bases we found at a trim shop for a few bucks each, covered in the fabric of our respective tails, and detailed with shells (Ryan's) or starfish, trim, and a pearl spray (mine). Ryan's will perch on top of a head of long dark hair, and mine will surround a wild updo.

We had a brilliant night Martha would be proud of, cranking out all the final details we needed for tomorrow. Jana even made a few accessories, and I whipped her up a shell-adorned hair clip I'm excited to see in action. Now that it's 2:15 I should be getting to bed, but I'm still a little keyed up. I'm also amazed, being I kicked out all my old ideas and really started from scratch again yesterday.

I AM SO EXCITED! Hope for dry skies :)